You’ve built Marionette on your server, and now need to connect to it with your client. You’re going to need to build the Marionette binary again, on the client this time, and configure it to connect to your server. These instructions are for the Mac OS, which has been tested against the User Guide provided by the development team.
Dependencies
The starting point for this guide is that you have Mac OSX installed, and have admin priveliges on the machine as a user. Start a Terminal window from Applications/Utilities, or type terminal into Spotlight. This will launch a terminal window, into which you can type Linux commands.
Golang
Go is a popular programming language that is used by Marionette, shapeshifter-dispatcher and other Pluggable Transports-related tools. To install, you will need to download and install it on your server. Here, we are downloading version 1.11, which is currently the latest version. See https://golang.org/dl to see if a newer version has been released.
$ curl -LO https://dl.google.com/go/go1.11.darwin-amd64.tar.gz
$ sudo tar -C /usr/local -xzf go1.11.darwin-amd64.tar.gz
This will install Go into the directory /usr/local/go. Now you will set up some variables so that your server and Go know where to keep files, using the nano text editor:
$ nano ~/.profile
You should add these lines to the end of the file:
export GOPATH=~/go
export GOBIN=$GOPATH/bin
export PATH=$PATH:/usr/local/go/bin:$GOPATH/bin
To create the path for Go to store its files and make the new paths effective immediately, run the commands:
mkdir ~/go
source ~/.profile
We set the value of GOPATH to ~/go. This means that Go will put its source code into ~/go/src and compiled programs into ~/go/bin.
Dep
Dep is a dependency manager for go. Just prior to installing Marionette, you will run Dep to make sure all of the dependencies are installed. To install Dep, you will first need to create a bin directory for Go, then fetch it from Github, and finally run the install script:
$ mkdir $GOPATH/bin
$ go get github.com/golang/dep
At this stage, you might get the message xcode-select: note: no developer tools were found.., and a window will pop up asking if you want to install developer tools. Click on the Install button, read the Terms and Conditions, and agree to them to install the developer tools. You can now continue with Dep, by first repeating the last attempt to download it:
$ go get github.com/golang/dep
$ cd $GOPATH/src/github.com/golang/dep
$ ./install.sh
If you now type dep you should see that it is installed, and it will return a page of usage instructions.
Installing Marionette
You now have most of the software you need to build Marionette. You will now download the source code using Go, and start the build as described in the (User Guide)[https://github.com/redjack/marionette/blob/master/doc/USER_GUIDE.md].
$ go get github.com/redjack/marionette
At this stage, you will get errors saying that libraries do not exist. These can be safely ignored, as they will be built in the next part of the process, which is building the third party scripts from the Marionette directory.
$ cd $GOPATH/src/github.com/redjack/marionette
$ ./build_third_party.sh
There will be a lot of information scrolling on the screen as the third party libraries are created. This process will take time, as the server will be fetching and compiling large files. You can check if it was successful with the command:
$ ls $GOPATH/src/github.com/redjack/marionette/third_party/libs
This should return a list of four files: libfst.a, libre2.a, libfstscript.a, libgmp.a
At this stage, you should now be ready to check dependencies and compile Marionette itself. However, you will need to fully install one of the third-party libraries:
$ cd $GOPATH/src/github.com/redjack/marionette/third_party/gmp-6.1.2
$ ./configure --enable-cxx
$ make
$ sudo make install
$ make check
One final check and download of dependencies:
$ cd $GOPATH/src/github.com/redjack/marionette
$ dep ensure
Now you will build Marionette with the following Go command:
$ go install ./cmd/marionette
You will likely get a message with ld: warning: PIE disabled. This can be safely ignored. At this point,
the build is complete, and the Marionette binary is in $GOPATH/bin and you’re ready to go! Remember, all of these steps only have to be completed once. From now on, if you need to restart your client, you can go straight to the command to run Marionette.
Running Marionette
For our reference implementation, we’re going to configure the client to connect to your SOCKS5 proxy, using its IP address:
$ marionette client -format http_simple_blocking -server xx.xx.xx.xx
The response should be:
listening on 127.0.0.1:8079, connected to xx.xx.xx.xx
This tells you that it has connected to your server, and is listening via port 8079 on the local machine.
Next, you’ll need to connect your browser to the Marionette server. The developers recommend that you do this with Firefox. Access the Preferences menu, and on the General tab look at the Network Proxy section. Click on Settings and it should look like this:
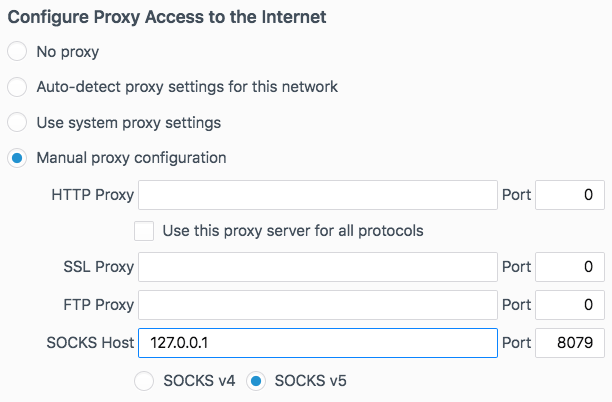
You will have chosen a Manual proxy configuration, with the SOCKS v5 radio button selected, and the SOCKS proxy set to the local IP address 127.0.0.1, port 8079 - this is where Marionette is listening for connections. Firefox is now access content via the Marionette client on the Mac, which is talking to your Marionette server.