Updated June 2020
This guide steps you through setting up your own obfuscated OpenVPN system.
Introduction
A VPN is an easy to manage service that can help users access content in countries where there is blocking of DNS, ports, IP addresses and protocols.
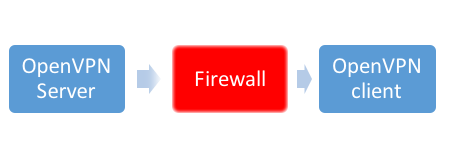
VPN circumventing a firewall
However, VPNs are increasingly targeted for blocking themselves. Deep Packet Inspection (DPI) is able to block any targeted application or protocol by filtering the traffic and preventing it from passing firewalls to the outside world Internet. As DPI firewalls act based on the packet type, not the port number, simple “tricks” like changing the port will not help
Pluggable transports make it possible to bypass such filtering without modifying the VPN itself but proxying the traffic into obfuscated tunnels which are significantly more difficult to identify and/or are costly to block to enable the traffic to pass through. Read more about different types of obfuscation or the history of filtering.
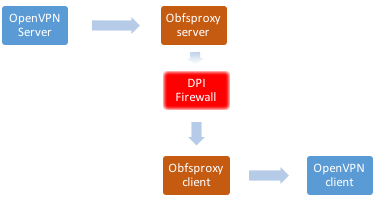
Obfuscated VPN circumventing a DPI firewall
In this process, we will be using shapeshifter-dispatcher which is a command line proxy tool which will act as a PT to help OpenVPN proxy the traffic through the firewall:
“The Shapeshifter project provides network protocol shapeshifting technology (also sometimes referred to as obfuscation). The purpose of this technology is to change the characteristics of network traffic so that it is not identified and subsequently blocked by network filtering devices.”
This tutorial uses Dispatcher to enable OpenVPN traffic to pass DPI firewalls, but it is important to note that this concept and process can apply to other services, including but not limited to VOIP and SSH or any other UDP or TCP connection.
If you already have OpenVPN installed and running on a server, you can skip forward to installing Dispatcher
Preparation
First, we will be installing the following packages that you will use during the installation
- Openssl, in case it was not installed, this will allow you to generate ssl certificate for the server and the clients
- ca-certificates, the common CA certificates
- git, distributed version control system, we will need it to setup shapeshifter-dispatcher
- curl, to get files from web or ftp server.
- screen, this application will help you to run processes in the background
- easy-rsa, required for creating certificates
apt-get update
apt-get install openssl ca-certificates git curl easy-rsa -y
Installing OpenVPN
In this step, we will install and configure OpenVPN Server on Ubuntu 16.04.1 LTS and test it in non-DPI environment to be sure that it’s working. Please note that the procedure will probably work on any Debian / Ubuntu distro. You must run the installation and configure the different applications as root or sudoers account.
apt-get install openvpn
Install and configure Certificates
In this step, you will create the PKI, setup the CA, DH parameters, the server and client certificates.
- Create CA directory:
make-cadir ~/openvpn-ca
cd ~/openvpn-ca
- You need to change the vars of the configuration you will generate, run the following commands and change the values:
nano vars
- change the following values to what you want it to be:
export KEY_COUNTRY="US"
export KEY_PROVINCE="CA"
export KEY_CITY="SanFrancisco"
export KEY_ORG="Fort-Funston"
export KEY_EMAIL="[email protected]"
export KEY_OU="MyOrganizationalUnit"
export KEY_NAME="server"
- then run the following command to use the vars:
source vars
- Run the following command to remove all the old keys
./clean-all
- Now generate your CA root certificate
./build-ca
- Now generate your server key file
./build-key-server server
After you finish the process, it will ask you to verify the expiration day of the certificate and the permission to issue the certificate, answer (Y) to both requests.
- Now generate Diffie-Hellman keys
./build-dh
- Now generate your TLS integrity verification capabilities, which will improve the security of the server and prevent any denial-of-service attempts
openvpn --genkey --secret keys/ta.key
- Move the files we need to OpenVPN main folder:
cd keys/
cp ca.crt ca.key server.crt server.key ta.key dh2048.pem /etc/openvpn/
- Create the server.conf file:
nano /etc/openvpn/server.conf
- Add the following configurations to it
mode server
tls-server
port 1194 #Change the port of OpenVPN to the one you want
proto tcp
dev tun
sndbuf 0
rcvbuf 0
ca ca.crt
cert server.crt
key server.key
dh dh2048.pem
tls-auth ta.key 0
topology subnet
server 10.8.0.0 255.255.255.0
ifconfig-pool-persist ipp.txt
push "redirect-gateway def1 bypass-dhcp"
push "dhcp-option DNS 208.67.222.222" #Change if you want to use a different DNS
push "dhcp-option DNS 208.67.220.220" #Change if you want to use a different DNS
keepalive 10 120
cipher AES-256-CBC
comp-lzo
persist-key
persist-tun
status openvpn-status.log
verb 3
Configure the network
In this step, you will configure your network to allow OpenVPN traffic. You will need to change the following values to the correct numbers:
- YOURSERVERIPADDRESS: The Public IP address of your server
- OPENVPNPORT: The port you will use for the OpenVPN Server
- OBFSPORT: The port you will use for shapeshifter-dispatcher
Allow IP forward, most of the Linux distributions will have IP Forwarding disabled for security reasons, but we will need to allow IP forward in order to allow the OpenVPN to function. By running the following command, we will check if IP Forwarding is enabled:
sysctl net.ipv4.ip_forward
if the value was 0:
net.ipv4.ip_forward = 0
that means IP forward is disabled, to enable it run the following command:
echo 1 > /proc/sys/net/ipv4/ip_forward
Set NAT for the VPN subnet:
iptables -t nat -A POSTROUTING -s 10.8.0.0/24 -j SNAT --to YOURSERVERIPADDRESS
iptables -I INPUT -p tcp --dport OPENVPNPORT -j ACCEPT
iptables -I FORWARD -s 10.8.0.0/24 -j ACCEPT
iptables -I FORWARD -m state --state RELATED,ESTABLISHED -j ACCEPT
Start the OpenVPN service
/etc/init.d/openvpn restart
systemctl start openvpn@server
- Now check if OpenVPN is running by checking if the tun0 interface is available
ip addr show tun0
- if you see a configured interface (Assigned IP address to tun) run the following command to enable OpenVPN:
systemctl enable openvpn@server
- Add a client:
In this step, you will create the key, certificate and configuration files for your first OpenVPN user. The configuration file will have the client certificate embedded.
cd ~/openvpn-ca/
source ./vars
- Create a key file named CLIENT
./pkitool CLIENT
- This process will generate CLIENT.key and CLIENT.crt, move them to OpenVPN folder
cd keys/
cp CLIENT.key CLIENT.crt /etc/openvpn
- Create the client configuration file:
nano CLIENT.ovpn
- Then add the following configurations to the file:
client
dev tun
proto tcp
sndbuf 0
rcvbuf 0
remote YOURSERVERIPADDRESS #Change this one to your public IP address
port 1194 #Change this one to the port you’re using for OpenVPN
resolv-retry infinite
nobind
persist-key
persist-tun
remote-cert-tls server
cipher AES-256-CBC
comp-lzo
setenv opt block-outside-dns
key-direction 1
verb 3
tls-auth ta.key 1
ca ca.crt
cert CLIENT.crt
key CLIENT.key
Save the file, name it CLIENT.ovpn and put it it along with the following files ,CLIENT.crt, CLIENT.key, ta.key and ca.crt and test the OpenVPN connection.
If it worked – continue to the installation of shapeshifter-dispatcher and enable obfuscation for OpenVPN.
Server Obfuscation Configuration
The next step is to install and use the shapeshifter-dispatcher server and client. See our guide to installing shapeshifter for instructions.
We’re going to use obfs-2 again for this, as it is the most simple to get up and running. The information you will need is:
Your server IP address - we’re going to use 203.0.113.101 in this guide. Your VPN port - we’re using 1194, but you may choose to run elsewhere. Your shapeshifter port - we’re going to use 2233 in our example.
Here’s the command to start shapeshifter with obfs2, installed as in our guide. The difference here is that we are setting -orport to our OpenVPN port (1194):
cd ~/shapeshifter-dispatcher
./shapeshifter-dispatcher -server -transparent -ptversion 2 -transports obfs2 -state state -bindaddr obfs2-203.0.113.101:2233 -orport 127.0.0.1:1194
Client Obfuscation Configuration
On the client, we’re going to need to do two things: run shapeshifter, and change our standard OpenVPN configuration to use it. You should have shapeshifter configured as in our guide to installing shapeshifter.
First, let’s run shapeshifter with obfs2. Don’t forget to change the target address to your server and its shapeshifter port.
cd ~/shapeshifter-dispatcher
./shapeshifter-dispatcher -transparent -client -state state -target 203.0.113.101:2233 -transports obfs2 -proxylistenaddr 127.0.0.1:4455 -logLevel DEBUG -enableLogging
Now, you’ll need to change some lines in your CLIENT.ovpn file. This is how the file should now look:
client
dev tun
proto tcp
sndbuf 0
rcvbuf 0
remote 127.0.0.1 #Change this one to your internal client IP address
port 4455 #Change this one to the shapeshifter port you're sending traffic through on the client
resolv-retry infinite
nobind
persist-key
persist-tun
remote-cert-tls server
cipher AES-256-CBC
comp-lzo
setenv opt block-outside-dns
key-direction 1
verb 3
tls-auth ta.key 1
ca ca.crt
cert CLIENT.crt
key CLIENT.key
route 203.0.113.101 255.255.255.255 net_gateway #Bypass the server in the VPN configuration
Note that you’ll need to use the port that shapeshifter is connecting to, because it will be handling the connection to the OpenVPN server. You will also need to bypass the VPN server from the OpenVPN configuration, as shapeshifter itself is handling that connection.
And now, you should have a working OpenVPN configuration, connecting over shapeshifter. Our guide to installing shapeshifter includes configuration options for obfs4, which can be used here, in the same way, in place of obfs2.